This post covers the necessary steps to equip your application deployment pipelines with automated passive penetration testing offered by Open Worldwide Application Security Project (OWASP) Zed Attack Proxy (ZAP).
Azure DevOps Agent Configuration
First things first, we need to create a self-hosted agent in Azure DevOps. This agent will host the OWASP ZAP software that we will leverage to run the scans from Azure pipelines. This section covers the installation process.
Build the Virtual Machine
Build a Windows Server virtual machine with line of sight to all the web application endpoints you plan to test against.
Install Azure DevOps Agent
Use Microsoft’s documentation to install the Self-hosted Windows agent. During the installation process, install the agent as a service and run the agent under the appropriate service account. Grant the necessary permissions to the service account on the server. Otherwise, use the default agent installation options.
Install OWASP ZAP Software
Download and install the latest OWASP ZAP software on the Self-hosted Windows server. There is a pre-requisite to have Java Runtime Environment (JRE) installed as well.
Copy NUnit.xslt
In order for the DevOps pipelines to publish the results of the OWASP scan to the Tests tab, the NUnit.xslt file is required. To simplify and centralize this process, we will copy it locally within the Agent.HomeDirectory.
<?xml version="1.0" encoding="UTF-8"?>
<xsl:stylesheet version="1.0" xmlns:xsl="http://www.w3.org/1999/XSL/Transform" xmlns:msxsl="urn:schemas-microsoft-com:xslt" exclude-result-prefixes="msxsl">
<xsl:output method="xml" indent="yes"/>
<xsl:variable name="NumberOfItems" select="count(OWASPZAPReport/site/alerts/alertitem)"/>
<xsl:template match="/">
<test-run id="1" name="OWASPReport" fullname="OWASPReport" testcasecount="{$NumberOfItems}" result="Failed" total="{$NumberOfItems}" passed="0" failed="{$NumberOfItems}" inconclusive="0" skipped="0" asserts="0" engine-version="3.9.0.0" clr-version="4.0.30319.42000" start-time="" end-time="" duration="0">
<test-suite type="Assembly" id="0-1000" name="Test" fullname="OWASPResults.Test" classname="OWASPResults.Test" runstate="Runnable" testcasecount="{$NumberOfItems}" result="Failed" site="Child" start-time="" end-time="" duration="0" total="{$NumberOfItems}" passed="0" failed="{$NumberOfItems}" warnings="0" inconclusive="0" skipped="0" asserts="0">
<xsl:for-each select="OWASPZAPReport/site/alerts/alertitem">
<test-case id="0-1001" name="{name}" fullname="{name}" methodname="Stub" classname="OWASPResults.Test" runstate="NotRunnable" seed="12345" result="Failed" label="Invalid" start-time="" end-time="" duration="0" asserts="0">
<failure>
<message>
<xsl:text>Risk: </xsl:text><xsl:value-of select="riskdesc"/>
<xsl:text>
Confidence: </xsl:text><xsl:value-of select="confidencedesc"/>
<xsl:text>

Description:</xsl:text><xsl:value-of select="desc"/>
<xsl:text>
Solution:</xsl:text><xsl:value-of select="solution"/>
<xsl:text>
Reference(s):</xsl:text><xsl:value-of select="reference"/>
</message>
<stack-trace>
<xsl:for-each select="instances/instance">
<xsl:if test="uri != ''">
<xsl:text>Uri: </xsl:text><xsl:value-of select="uri"/>
</xsl:if>
<xsl:if test="method != ''">
<xsl:text>
Method: </xsl:text> <xsl:value-of select="method"/>
</xsl:if>
<xsl:if test="param != ''">
<xsl:text>
Param: </xsl:text> <xsl:value-of select="param"/>
</xsl:if>
<xsl:if test="attack != ''">
<xsl:text>
Attack: </xsl:text> <xsl:value-of select="attack"/>
</xsl:if>
<xsl:if test="evidence != ''">
<xsl:text>
Evidence: </xsl:text> <xsl:value-of select="evidence"/>
</xsl:if>
<xsl:if test="otherinfo != ''">
<xsl:text>
Info: </xsl:text> <xsl:value-of select="otherinfo"/>
</xsl:if>
-
</xsl:for-each>
</stack-trace>
</failure>
</test-case>
</xsl:for-each>
</test-suite>
</test-run>
</xsl:template>
</xsl:stylesheet>
Azure DevOps Integration
This section covers the requirements for integration within Azure DevOps application pipeline.
OWASP Scan Configuration
To enable the scan, a configuration is required to be created within the source repo. This configuration leverages the OWASP ZAP Automation Framework.
Create a file called owasp.yaml with the contents below. Modify the URLs and includePaths lines to match your requirements, also tweak parameters as required, this is just a basic skeleton.
--- # OWASP ZAP automation configuration file, for more details see https://www.zaproxy.org/docs/automate/automation-framework/
env:
  contexts:
    - name: "Default Context"
      urls:
      - "https://{url-here}"
      includePaths:
      - "https://{url-here}*"
  parameters:
    failOnError: true
    failOnWarning: false
    progressToStdout: true

jobs:
  - type: spider
    parameters:
      context: "Default Context"
    tests:
      - name: 'At least 100 URLs found'
        type: 'stats'
        statistic: 'automation.spider.urls.added'
        operator: '>='
        value: 100
        onFail: 'info'
  - name: activeScan
    type: activeScan
    parameters:
      context: "Default Context"
  - name: report
    type: report
    parameters:
      template: traditional-xml
      reportDir: "C:\\agent\\_work\\_temp"
      reportFile: "owasp-zap-report"
      reportTitle: "OWASP ZAP Scan Report"
      reportDescription: ""
    risks:
    - "info"
    - "low"
    - "medium"
    - "high"
    confidences:
    - "falsepositive"
    - "low"
    - "medium"
    - "high"
    - "confirmed"
    sections:
    - "siteRiskCounts"
    - "responseBody"
    - "appendix"
    - "alertTypes"
    - "responseHeader"
    - "alertTypeCounts"
    - "riskConfidenceCounts"
    - "alerts"
    - "aboutThisReport"
    - "contents"
    - "requestBody"
    - "reportDescription"
    - "reportParameters"
    - "requestHeader"
    - "summaries"
Azure Pipeline Task
Use the YAML snippet below and add it to your exiting pipeline. Make sure to point to your new self-hosted agent pool that has the OWASP ZAP software installed.
The one line that may require modification is %AGENT_BUILDDIRECTORY%\drop\owasp\owasp.yaml. This points to the location of the owasp.yaml file created in the previous section.
Build Task
- task: PublishBuildArtifacts@1
  displayName: 'Publish OWASP Artifact'
  inputs:
    pathToPublish: '$(Build.SourcesDirectory)/owasp.yaml'
    artifactName: 'owasp'
Release Task
- task: CmdLine@2
  displayName: 'Run OWASP ZAP Scan'
  inputs:
    script: |
    zap.bat -cmd -autorun %AGENT_BUILDDIRECTORY%\owasp\owasp.yaml & exit 0
    workingDirectory: 'C:\Program Files\ZAP\Zed Attack Proxy'

- task: PowerShell@2
  displayName: 'Convert ZAP XML Report to NUnit Format'
  inputs:
    targetType: 'inline'
    script: |
    $xslPath = "$env:AGENT_HOMEDIRECTORY\NUnit.xslt"
    $xmlInputPath = "$env:AGENT_TEMPDIRECTORY/owasp-zap-report.xml"
    $xmlOutputPath = "$env:AGENT_TEMPDIRECTORY/owasp-zap-report-final.xml"
    $xslTransform = New-Object System.Xml.Xsl.XslCompiledTransform
    $xslTransform.Load($xslPath)
    $xslTransform.Transform($xmlInputPath, $xmlOutputPath)

- task: PublishTestResults@2
  displayName: 'Publish Results'
  inputs:
    testResultsFormat: 'NUnit'
    testResultsFiles: '**/owasp-zap-report-final.xml'
    searchFolder: '$(Agent.TempDirectory)'
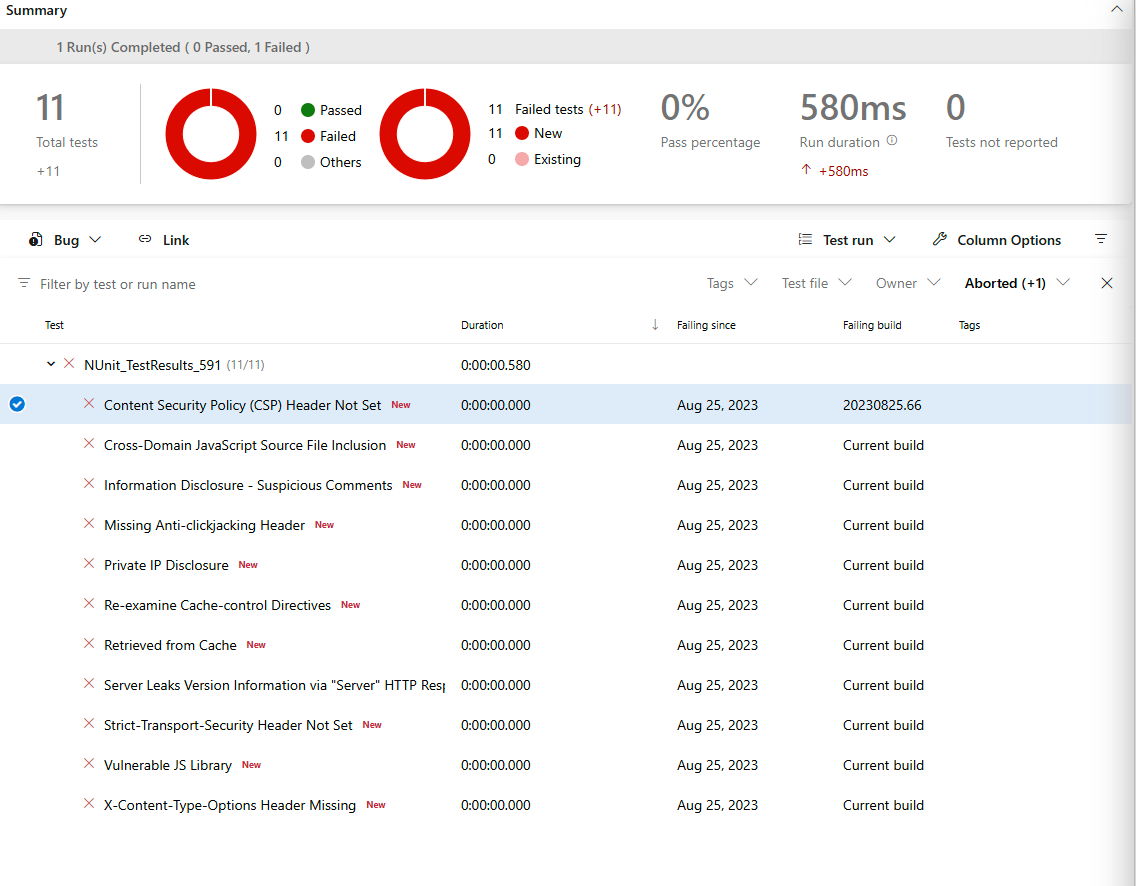
Results
Upon completion of a successful OWASP scan, the results will be published on the Tests tab in Azure DevOps as shown below.
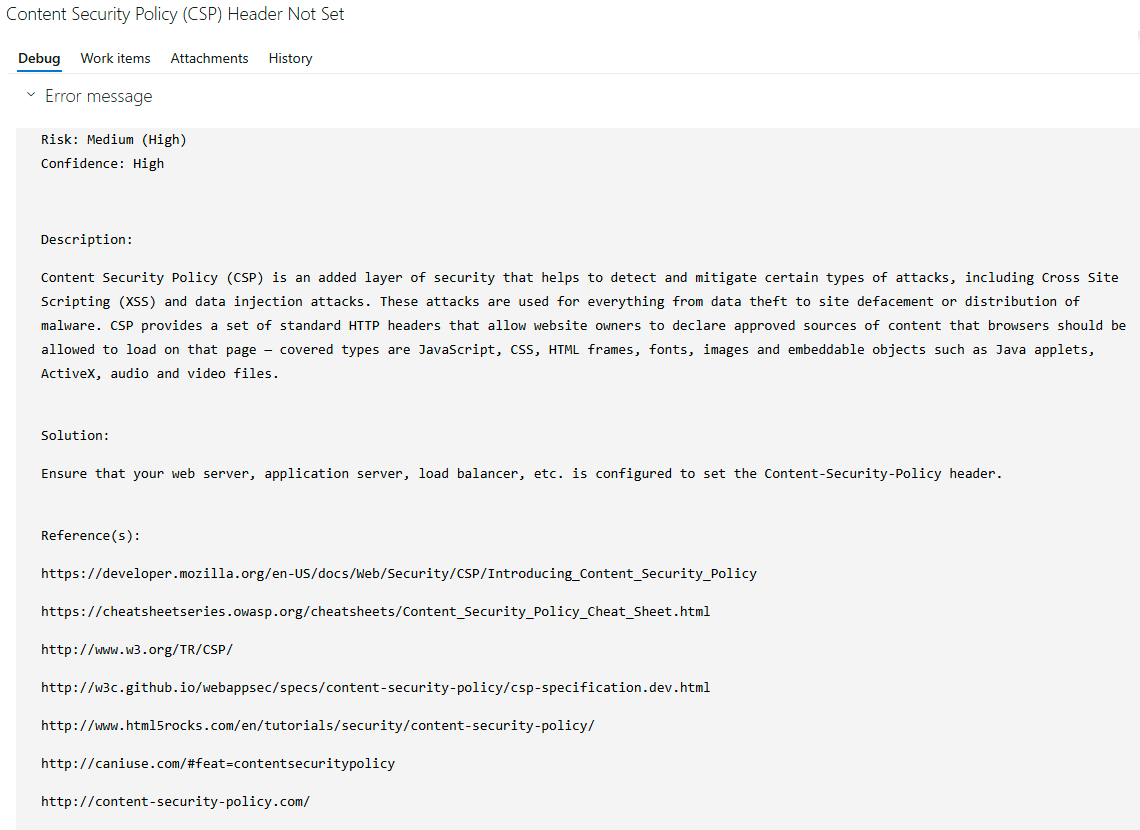
Clicking on each item will give you additional information about the finding.