With everyone moving to a DevOps and Agile mentality, it is more important then ever to implement security checks and scans into your DevOps pipelines. In this post I will go through several tools and scenarios which I have tested and used.
We will be investigating four Azure DevOps extensions which are available in the Marketplace in this blog post. These extensions can help you improve security within our CI/CD pipelines.
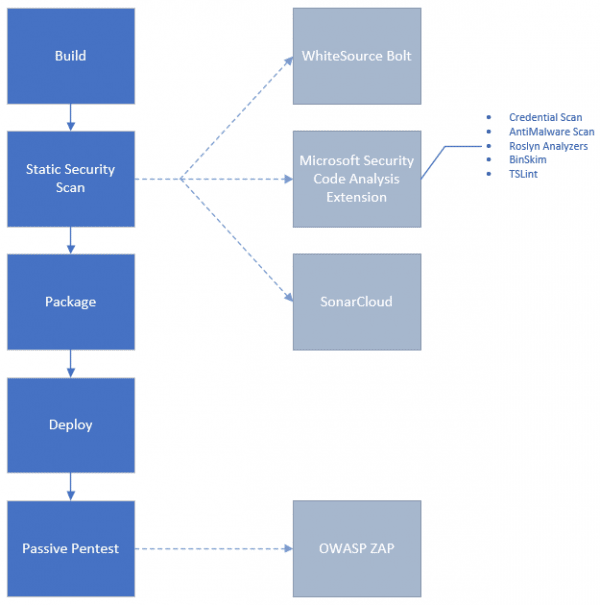
Pipeline Security Overview
Microsoft Security Code Analysis

-
This extension is available through Microsoft Unified Support Services.
-
Pricing is per Azure DevOps instance per year. Thie extension is fairly pricey, but provides good value if you are a large organization.
-
It includes 6 different tools, 5 of which are included in the per year pricing:
-
- Find credentials in source code.
-
- Cutting edge binary static analysis.
-
- Security rules for TypeScript.
-
- .NET managed code analysis.
-
Microsoft Security Risk Detection
- Binary fuzzing, which is a technique of passing random data to software in an attempt to find errors and security holes.
- Separate onboarding process: it is not ‘plug-and-play’ as other tasks in this extension.
- Pricing is based on subscription length.
- Pricing for this can be for 1, 2, or 3 months at a time or for a full year.
- This is an expensive service.
-
- Run Defender on your build artifacts to find Malware.
-
-
Some of these tools are open source and are available online, like BinSkim and TSLint. You could in theory manage these yourself in a Pipeline, Microsoft’s extension simplifies the usage.
-
There is 2 week trial available through Microsoft for this extension, so you can try before you buy. This extension is hidden in the marketplace by default, so you won’t be able to see it until you are on-boarded.
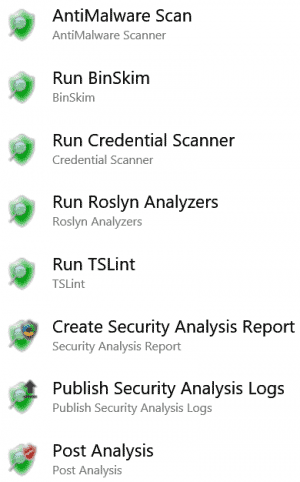
Recommended Pattern
Using the recommended pattern, will perform all the scans with the exception of Risk Detection.
Artifacts and Report
Here is an example of some output artifacts, including the Microsoft Security Analysis Report which is highlighted.
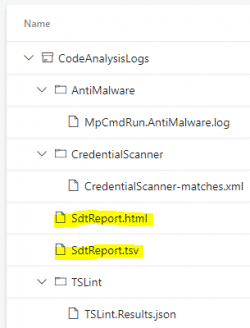
The report can be sent to Pipeline Console, TSV and HTML file. When publishing your results, you can send them to an Azure DevOps or a file share.
SonarCloud
SonarCloud is the big brother of SonarQube, which is a very popular product, they are both used for Continuous Code Quality. It supports a wide range of programming languages! SonarCloud will improve code quality and security by finding bugs and vulnerabilities in your code.
SonarCloud as the name states is for the cloud, where as SonarQube is for on-premises. Since SonarCloud is a cloud based service, you don’t need to stand up any server infrastructure like you have to with SonarQube.
When you configure the Service Connection for SonarCloud in Azure DevOps, you provide a token which is generated through the SonarCloud portal.
By default SonarCloud will scan all branches and all pull requests. You can also integrate SonarCloud into Branch Policies so there is build validation within your pull requests.
Pricing
There is currently 2 pricing options available. SonarCloud is free for all public projects (open source public repositories).
For private projects (private repositories), pricing is based on the number of lines of code to scan per month. There is a good plan and pricing breakdown on their website.
SonarCloud offers a 14 day trial for private projects.
Free Labs
There are a couple of free labs available from Microsoft to get you up to speed with SonarCloud.
OWASP ZAP Scanner
OWASP ZAP is recommended by Microsoft as a continuous security validation tool that can be added to the CI/CD pipeline.
The OWASP ZAP Scanner Azure DevOps extension can be used to perform penetration testing within your pipelines. It can scan url endpoints along with scanning detached containers. It is available for free.
During my testing it was determined that this extension is using owasp/zap2docker-stable docker container and not the owasp/zap2docker-weekly one which I prefer. owasp/zap2docker-stable is updated less frequently so it may not have the latest updates.
Keep in mind that there no support for authentication with this extension, however if you feel that you require authentication to scan your web app as an authorized user, you can use OWASP Zed Attack Proxy as it supports authentication whereas the other mechanisms do not. With OWASP Zed Attack Proxy installed on a Virtual Machine in Azure, you can create the necessary contexts and use the OWASP Zed Attack Proxy Scan Azure DevOps Extension within your CI/CD pipelines to point to your OWASP Zed Attack Proxy endpoint and context.
Sample Process
Keep in mind this is an example and can be adapted for any CI/CD pipeline.
- Developer writes/updates code for web app and submits pull request.
- Code is reviewed and approved. (assuming this is the gating process for said application)
- Build pipeline is triggered, completes the build.
- Release pipeline is triggered based on continuous deployment trigger.
- Release pipeline deploys the code to an App Service in Azure as an example.
- OWASP ZAP Scanner DevOps Extension is activated to run an automated scan against the website.
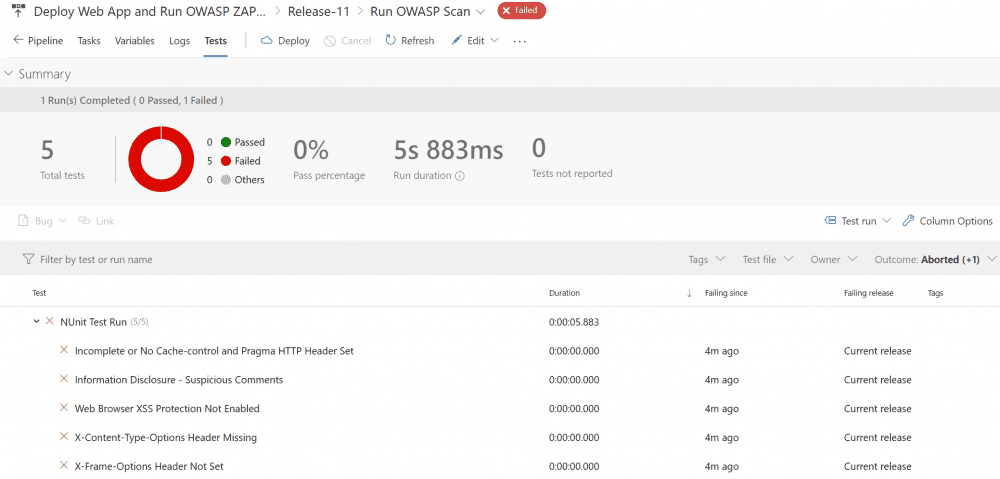
- If any checks are failed, results are shown on the Tests tab of the pipeline job.
Release Pipeline
In our example we will create a release pipeline with continuous deployment enabled, the pipeline will do the following:
- Deploy our CI build to Microsoft Azure App Service.
- Perform penetration testing using OWASP ZAP Scanner extension to scan url for vulnerabilities.
- Attach any failures to the Tests tab of the pipeline job.
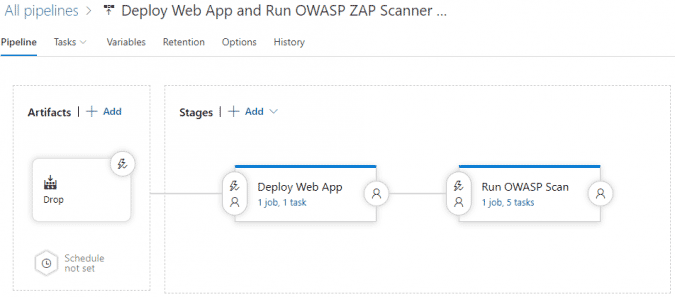
- Add your build artifact(s), the Deploy Web App and Run OWASP Scan stages in your release pipeline, it should look something like this.
- Add the necessary tasks to the Run OWASP Scan stage. The tasks 2-4 are related to reporting and details can be found in the extension documentation.
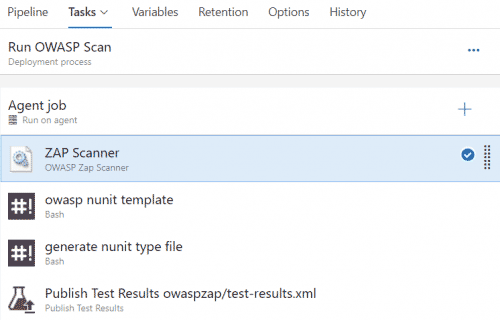
ZAP Scanner
- Task Type: OWASP Zap Scanner
- Scan Type: Targeted Scan
- Root URL to begin crawling: https://www.yourdomainhere.com
owasp nunit template
- Task Type: Bash
- Type: Inline
- Run this task: Even if a previous task has failed, even if the deployment was canceled
- Script:
sudo npm install -g handlebars-cmd

cat <<EOF > owaspzap/nunit-template.hbs
{{#each site}}

<test-run
   id="2"
   name="Owasp test"
   start-time="{{../[@generated]}}"  >
   <test-suite
	   id="{{@index}}"
	   type="Assembly"
	   name="{{[@name]}}"
	   result="Failed"
	   failed="{{alerts.length}}">
	   <attachments>
		   <attachment>
			   <filePath>owaspzap/report.html</filePath>
		   </attachment>
	   </attachments>
   {{#each alerts}}<test-case
	   id="{{@index}}"
	   name="{{alert}}"
	   result="Failed"
	   fullname="{{alert}}"
	   time="1">
		   <failure>
			   <message>
				   <![CDATA[{{{desc}}}]]>
			   </message>
			   <stack-trace>
				   <![CDATA[
Solution:
{{{solution}}}

Reference:
{{{reference}}}

instances:{{#each instances}}
* {{uri}}
   - {{method}}
   {{#if evidence}}- {{{evidence}}}{{/if}}
				   {{/each}}]]>
			   </stack-trace>
		   </failure>
   </test-case>
   {{/each}}
   </test-suite>
</test-run>
{{/each}}
EOF
generate nunit type file
- Task Type: Bash
- Type: Inline
- Run this task: Even if a previous task has failed, even if the deployment was canceled
- Script:
handlebars owaspzap/report.json < owaspzap/nunit-template.hbs > owaspzap/test-results.xml
Publish Test Results owaspzap/test-results.xml
- Task Type: Publish Test Results
- Test result format: NUnit
- Test results files: owaspzap/test-results.xml
- Run this task: Even if a previous task has failed, even if the deployment was canceled
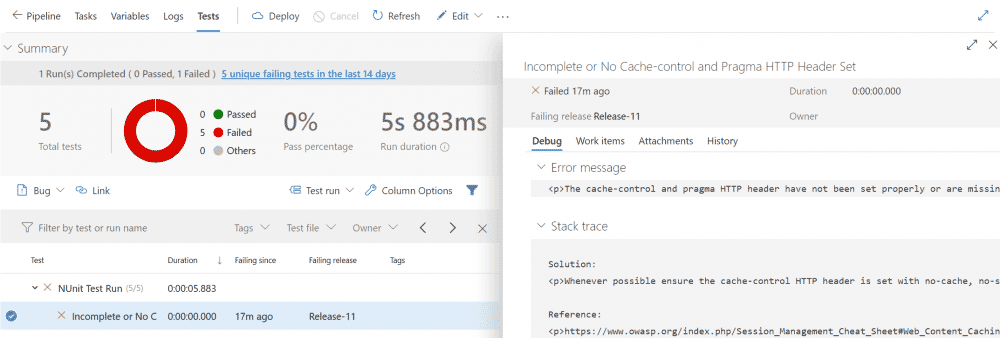
Sample Output
Here is output from the release.
Sample Containerized Application Process
Keep in mind this is an example and can be adapted for any CI/CD pipeline.
- Developer writes/updates code for containerized application and submits pull request.
- Code is reviewed and approved. (assuming this is the gating process for said application)
- Build pipeline is triggered.
- The container image is built using the Dockerfile.
- The image is run as a locally detached container.
- OWASP ZAP Scanner DevOps Extension is activated to run an automated scan against the container.
- If any checks are failed, results are shown on the Tests tab of the pipeline job.
Build Pipeline
In our example we will create a build pipeline, the pipeline will do the following:
- Build a docker container image from source.
- Perform penetration testing using OWASP ZAP Scanner extension to scan our container for vulnerabilities.
- Attach any failures to the Tests tab of the pipeline job.
Some items to keep in mind:
- The container must be run in detached mode.
- The extension documentation states “By default, that “Scan Type” used is “Scan on Agent.” This type of scan is beneficial in pipelines for containerized applications”. However, I found that using “Scan on Agent” did not work in my scenario, it kept trying to scan an IP address that was not associated to any container that was running.
trigger:
- master

pool:
  vmImage: 'Ubuntu-16.04'

variables:
  imageName: 'containerdemo'

steps:
- task: Docker@2
  displayName: Build an image
  inputs:
    repository: $(imageName)
    command: build
    Dockerfile: app/Dockerfile

- task: CmdLine@2
  displayName: Run the image locally detached
  inputs:
    script: 'docker run -d $(imageName):$(Build.BuildId)'

- task: owaspzap@1
  displayName: Run OWASP scan
  inputs:
    scantype: 'targetedScan'
    url: 'http://172.17.0.2'
    port: '8080'
  condition: always()

- bash: |
   sudo npm install -g handlebars-cmd

   cat <<EOF > owaspzap/nunit-template.hbs
   {{#each site}}

   <test-run
       id="2"
       name="Owasp test"
       start-time="{{../[@generated]}}"  >
       <test-suite
           id="{{@index}}"
           type="Assembly"
           name="{{[@name]}}"
           result="Failed"
           failed="{{alerts.length}}">
           <attachments>
               <attachment>
                   <filePath>owaspzap/report.html</filePath>
               </attachment>
           </attachments>
       {{#each alerts}}<test-case
           id="{{@index}}"
           name="{{alert}}"
           result="Failed"
           fullname="{{alert}}"
           time="1">
               <failure>
                   <message>
                       <![CDATA[{{{desc}}}]]>
                   </message>
                   <stack-trace>
                       <![CDATA[
   Solution:
   {{{solution}}}

   Reference:
   {{{reference}}}

   instances:{{#each instances}}
   * {{uri}}
       - {{method}}
       {{#if evidence}}- {{{evidence}}}{{/if}}
                       {{/each}}]]>
                   </stack-trace>
               </failure>
       </test-case>
       {{/each}}
       </test-suite>
   </test-run>
   {{/each}}
   EOF
  displayName: 'owasp nunit template'
  condition: always()

- bash: ' handlebars owaspzap/report.json < owaspzap/nunit-template.hbs > owaspzap/test-results.xml'
  displayName: 'generate nunit type file'
  condition: always()

- task: PublishTestResults@2
  displayName: 'Publish Test Results'
  inputs:
    testResultsFormat: NUnit
    testResultsFiles: 'owaspzap/test-results.xml'
  condition: always()
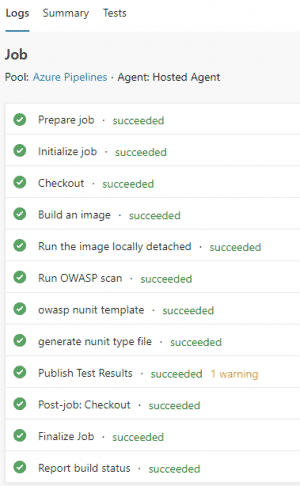
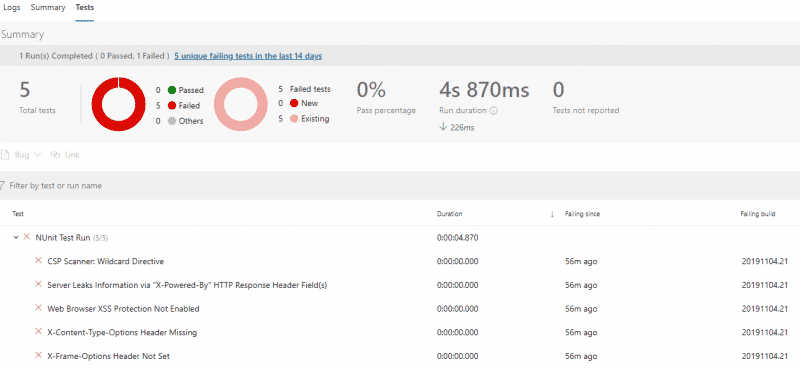
Sample Output
Here is output from the release.
Sample HTML Report
<h1>
ZAP Scanning Report
</h1>

<b>Summary of Alerts</b>
<table width="45%" class="summary">
<tr bgcolor="#666666">
<th width="45%" height="24">Risk
      Level</th><th width="55%" align="center">Number
      of Alerts</th>
</tr>
<tr bgcolor="#e8e8e8">
<td><a href="#high">High</a></td><td align="center">0</td>
</tr>
<tr bgcolor="#e8e8e8">
<td><a href="#medium">Medium</a></td><td align="center">1</td>
</tr>
<tr bgcolor="#e8e8e8">
<td><a href="#low">Low</a></td><td align="center">3</td>
</tr>
<tr bgcolor="#e8e8e8">
<td><a href="#info">Informational</a></td><td align="center">0</td>
</tr>
</table>
<div class="spacer-lg"></div>
<div class="spacer"></div>
<table width="100%" class="results">


<tr height="24" class="risk-medium">
<th width="20%"><a name="medium"></a>Medium (Medium)</th><th width="80%">X-Frame-Options Header Not Set</th>
</tr>


<tr bgcolor="#e8e8e8">
<td width="20%">Description</td><td width="80%"><p>X-Frame-Options header is not included in the HTTP response to protect against 'ClickJacking' attacks.</p></td>
</tr>
<TR vAlign="top">
<TD colspan="2"></TD>
</TR>


<tr bgcolor="#e8e8e8">
<td width="20%" class="indent1">URL</td><td width="80%">https://lj-devsecops.azurewebsites.net/Home/Privacy</td>
</tr>

<tr bgcolor="#e8e8e8">
<td width="20%" class="indent2">Method</td><td width="80%">GET</td>
</tr>

<tr bgcolor="#e8e8e8">
<td width="20%" class="indent2">Parameter</td><td width="80%">X-Frame-Options</td>
</tr>


<tr bgcolor="#e8e8e8">
<td width="20%" class="indent1">URL</td><td width="80%">https://lj-devsecops.azurewebsites.net</td>
</tr>

<tr bgcolor="#e8e8e8">
<td width="20%" class="indent2">Method</td><td width="80%">GET</td>
</tr>

<tr bgcolor="#e8e8e8">
<td width="20%" class="indent2">Parameter</td><td width="80%">X-Frame-Options</td>
</tr>


<tr bgcolor="#e8e8e8">
<td width="20%" class="indent1">URL</td><td width="80%">https://lj-devsecops.azurewebsites.net/</td>
</tr>

<tr bgcolor="#e8e8e8">
<td width="20%" class="indent2">Method</td><td width="80%">GET</td>
</tr>

<tr bgcolor="#e8e8e8">
<td width="20%" class="indent2">Parameter</td><td width="80%">X-Frame-Options</td>
</tr>


<tr bgcolor="#e8e8e8">
<td width="20%">Instances</td><td width="80%">3</td>
</tr>

<tr bgcolor="#e8e8e8">
<td width="20%">Solution</td><td width="80%"><p>Most modern Web browsers support the X-Frame-Options HTTP header. Ensure it's set on all web pages returned by your site (if you expect the page to be framed only by pages on your server (e.g. it's part of a FRAMESET) then you'll want to use SAMEORIGIN, otherwise if you never expect the page to be framed, you should use DENY. ALLOW-FROM allows specific websites to frame the web page in supported web browsers).</p></td>
</tr>

<tr bgcolor="#e8e8e8">
<td width="20%">Reference</td><td width="80%"><p>http://blogs.msdn.com/b/ieinternals/archive/2010/03/30/combating-clickjacking-with-x-frame-options.aspx</p></td>
</tr>

<tr bgcolor="#e8e8e8">
<td width="20%">CWE Id</td><td width="80%">16</td>
</tr>

<tr bgcolor="#e8e8e8">
<td width="20%">WASC Id</td><td width="80%">15</td>
</tr>

<tr bgcolor="#e8e8e8">
<td width="20%">Source ID</td><td width="80%">3</td>
</tr>

</table>
<div class="spacer"></div>
<table width="100%" class="results">

<tr height="24" class="risk-low">
<a name="low"></a><th width="20%">Low (Medium)</th><th width="80%">Web Browser XSS Protection Not Enabled</th>
</tr>


<tr bgcolor="#e8e8e8">
<td width="20%">Description</td><td width="80%"><p>Web Browser XSS Protection is not enabled, or is disabled by the configuration of the 'X-XSS-Protection' HTTP response header on the web server</p></td>
</tr>
<TR vAlign="top">
<TD colspan="2"></TD>
</TR>


<tr bgcolor="#e8e8e8">
<td width="20%" class="indent1">URL</td><td width="80%">https://lj-devsecops.azurewebsites.net/Home/Privacy</td>
</tr>

<tr bgcolor="#e8e8e8">
<td width="20%" class="indent2">Method</td><td width="80%">GET</td>
</tr>

<tr bgcolor="#e8e8e8">
<td width="20%" class="indent2">Parameter</td><td width="80%">X-XSS-Protection</td>
</tr>


<tr bgcolor="#e8e8e8">
<td width="20%" class="indent1">URL</td><td width="80%">https://lj-devsecops.azurewebsites.net/</td>
</tr>

<tr bgcolor="#e8e8e8">
<td width="20%" class="indent2">Method</td><td width="80%">GET</td>
</tr>

<tr bgcolor="#e8e8e8">
<td width="20%" class="indent2">Parameter</td><td width="80%">X-XSS-Protection</td>
</tr>


<tr bgcolor="#e8e8e8">
<td width="20%" class="indent1">URL</td><td width="80%">https://lj-devsecops.azurewebsites.net</td>
</tr>

<tr bgcolor="#e8e8e8">
<td width="20%" class="indent2">Method</td><td width="80%">GET</td>
</tr>

<tr bgcolor="#e8e8e8">
<td width="20%" class="indent2">Parameter</td><td width="80%">X-XSS-Protection</td>
</tr>


<tr bgcolor="#e8e8e8">
<td width="20%">Instances</td><td width="80%">3</td>
</tr>

<tr bgcolor="#e8e8e8">
<td width="20%">Solution</td><td width="80%"><p>Ensure that the web browser's XSS filter is enabled, by setting the X-XSS-Protection HTTP response header to '1'.</p></td>
</tr>

<tr bgcolor="#e8e8e8">
<td width="20%">Other information</td><td width="80%"><p>The X-XSS-Protection HTTP response header allows the web server to enable or disable the web browser's XSS protection mechanism. The following values would attempt to enable it: </p><p>X-XSS-Protection: 1; mode=block</p><p>X-XSS-Protection: 1; report=http://www.example.com/xss</p><p>The following values would disable it:</p><p>X-XSS-Protection: 0</p><p>The X-XSS-Protection HTTP response header is currently supported on Internet Explorer, Chrome and Safari (WebKit).</p><p>Note that this alert is only raised if the response body could potentially contain an XSS payload (with a text-based content type, with a non-zero length).</p></td>
</tr>
<TR vAlign="top">
<TD colspan="2"></TD>
</TR>

<tr bgcolor="#e8e8e8">
<td width="20%">Reference</td><td width="80%"><p>https://www.owasp.org/index.php/XSS_(Cross_Site_Scripting)_Prevention_Cheat_Sheet</p><p>https://www.veracode.com/blog/2014/03/guidelines-for-setting-security-headers/</p></td>
</tr>

<tr bgcolor="#e8e8e8">
<td width="20%">CWE Id</td><td width="80%">933</td>
</tr>

<tr bgcolor="#e8e8e8">
<td width="20%">WASC Id</td><td width="80%">14</td>
</tr>

<tr bgcolor="#e8e8e8">
<td width="20%">Source ID</td><td width="80%">3</td>
</tr>

</table>
<div class="spacer"></div>
<table width="100%" class="results">


<tr height="24" class="risk-low">
<a name="low"></a><th width="20%">Low (Medium)</th><th width="80%">Incomplete or No Cache-control and Pragma HTTP Header Set</th>
</tr>


<tr bgcolor="#e8e8e8">
<td width="20%">Description</td><td width="80%"><p>The cache-control and pragma HTTP header have not been set properly or are missing allowing the browser and proxies to cache content.</p></td>
</tr>
<TR vAlign="top">
<TD colspan="2"></TD>
</TR>


<tr bgcolor="#e8e8e8">
<td width="20%" class="indent1">URL</td><td width="80%">https://lj-devsecops.azurewebsites.net/Home/Privacy</td>
</tr>

<tr bgcolor="#e8e8e8">
<td width="20%" class="indent2">Method</td><td width="80%">GET</td>
</tr>

<tr bgcolor="#e8e8e8">
<td width="20%" class="indent2">Parameter</td><td width="80%">Cache-Control</td>
</tr>


<tr bgcolor="#e8e8e8">
<td width="20%" class="indent1">URL</td><td width="80%">https://lj-devsecops.azurewebsites.net/css/site.css</td>
</tr>

<tr bgcolor="#e8e8e8">
<td width="20%" class="indent2">Method</td><td width="80%">GET</td>
</tr>

<tr bgcolor="#e8e8e8">
<td width="20%" class="indent2">Parameter</td><td width="80%">Cache-Control</td>
</tr>


<tr bgcolor="#e8e8e8">
<td width="20%" class="indent1">URL</td><td width="80%">https://lj-devsecops.azurewebsites.net/</td>
</tr>

<tr bgcolor="#e8e8e8">
<td width="20%" class="indent2">Method</td><td width="80%">GET</td>
</tr>

<tr bgcolor="#e8e8e8">
<td width="20%" class="indent2">Parameter</td><td width="80%">Cache-Control</td>
</tr>


<tr bgcolor="#e8e8e8">
<td width="20%" class="indent1">URL</td><td width="80%">https://lj-devsecops.azurewebsites.net</td>
</tr>

<tr bgcolor="#e8e8e8">
<td width="20%" class="indent2">Method</td><td width="80%">GET</td>
</tr>

<tr bgcolor="#e8e8e8">
<td width="20%" class="indent2">Parameter</td><td width="80%">Cache-Control</td>
</tr>


<tr bgcolor="#e8e8e8">
<td width="20%">Instances</td><td width="80%">4</td>
</tr>

<tr bgcolor="#e8e8e8">
<td width="20%">Solution</td><td width="80%"><p>Whenever possible ensure the cache-control HTTP header is set with no-cache, no-store, must-revalidate; and that the pragma HTTP header is set with no-cache.</p></td>
</tr>

<tr bgcolor="#e8e8e8">
<td width="20%">Reference</td><td width="80%"><p>https://www.owasp.org/index.php/Session_Management_Cheat_Sheet#Web_Content_Caching</p></td>
</tr>

<tr bgcolor="#e8e8e8">
<td width="20%">CWE Id</td><td width="80%">525</td>
</tr>

<tr bgcolor="#e8e8e8">
<td width="20%">WASC Id</td><td width="80%">13</td>
</tr>

<tr bgcolor="#e8e8e8">
<td width="20%">Source ID</td><td width="80%">3</td>
</tr>

</table>
<div class="spacer"></div>
<table width="100%" class="results">


<tr height="24" class="risk-low">
<a name="low"></a><th width="20%">Low (Medium)</th><th width="80%">X-Content-Type-Options Header Missing</th>
</tr>


<tr bgcolor="#e8e8e8">
<td width="20%">Description</td><td width="80%"><p>The Anti-MIME-Sniffing header X-Content-Type-Options was not set to 'nosniff'. This allows older versions of Internet Explorer and Chrome to perform MIME-sniffing on the response body, potentially causing the response body to be interpreted and displayed as a content type other than the declared content type. Current (early 2014) and legacy versions of Firefox will use the declared content type (if one is set), rather than performing MIME-sniffing.</p></td>
</tr>
<TR vAlign="top">
<TD colspan="2"></TD>
</TR>


<tr bgcolor="#e8e8e8">
<td width="20%" class="indent1">URL</td><td width="80%">https://lj-devsecops.azurewebsites.net/css/site.css</td>
</tr>

<tr bgcolor="#e8e8e8">
<td width="20%" class="indent2">Method</td><td width="80%">GET</td>
</tr>

<tr bgcolor="#e8e8e8">
<td width="20%" class="indent2">Parameter</td><td width="80%">X-Content-Type-Options</td>
</tr>


<tr bgcolor="#e8e8e8">
<td width="20%" class="indent1">URL</td><td width="80%">https://lj-devsecops.azurewebsites.net/Home/Privacy</td>
</tr>

<tr bgcolor="#e8e8e8">
<td width="20%" class="indent2">Method</td><td width="80%">GET</td>
</tr>

<tr bgcolor="#e8e8e8">
<td width="20%" class="indent2">Parameter</td><td width="80%">X-Content-Type-Options</td>
</tr>


<tr bgcolor="#e8e8e8">
<td width="20%" class="indent1">URL</td><td width="80%">https://lj-devsecops.azurewebsites.net/js/site.js?v=4q1jwFhaPaZgr8WAUSrux6hAuh0XDg9kPS3xIVq36I0</td>
</tr>

<tr bgcolor="#e8e8e8">
<td width="20%" class="indent2">Method</td><td width="80%">GET</td>
</tr>

<tr bgcolor="#e8e8e8">
<td width="20%" class="indent2">Parameter</td><td width="80%">X-Content-Type-Options</td>
</tr>


<tr bgcolor="#e8e8e8">
<td width="20%" class="indent1">URL</td><td width="80%">https://lj-devsecops.azurewebsites.net</td>
</tr>

<tr bgcolor="#e8e8e8">
<td width="20%" class="indent2">Method</td><td width="80%">GET</td>
</tr>

<tr bgcolor="#e8e8e8">
<td width="20%" class="indent2">Parameter</td><td width="80%">X-Content-Type-Options</td>
</tr>


<tr bgcolor="#e8e8e8">
<td width="20%" class="indent1">URL</td><td width="80%">https://lj-devsecops.azurewebsites.net/</td>
</tr>

<tr bgcolor="#e8e8e8">
<td width="20%" class="indent2">Method</td><td width="80%">GET</td>
</tr>

<tr bgcolor="#e8e8e8">
<td width="20%" class="indent2">Parameter</td><td width="80%">X-Content-Type-Options</td>
</tr>


<tr bgcolor="#e8e8e8">
<td width="20%">Instances</td><td width="80%">5</td>
</tr>

<tr bgcolor="#e8e8e8">
<td width="20%">Solution</td><td width="80%"><p>Ensure that the application/web server sets the Content-Type header appropriately, and that it sets the X-Content-Type-Options header to 'nosniff' for all web pages.</p><p>If possible, ensure that the end user uses a standards-compliant and modern web browser that does not perform MIME-sniffing at all, or that can be directed by the web application/web server to not perform MIME-sniffing.</p></td>
</tr>

<tr bgcolor="#e8e8e8">
<td width="20%">Other information</td><td width="80%"><p>This issue still applies to error type pages (401, 403, 500, etc) as those pages are often still affected by injection issues, in which case there is still concern for browsers sniffing pages away from their actual content type.</p><p>At "High" threshold this scanner will not alert on client or server error responses.</p></td>
</tr>
<TR vAlign="top">
<TD colspan="2"></TD>
</TR>

<tr bgcolor="#e8e8e8">
<td width="20%">Reference</td><td width="80%"><p>http://msdn.microsoft.com/en-us/library/ie/gg622941%28v=vs.85%29.aspx</p><p>https://www.owasp.org/index.php/List_of_useful_HTTP_headers</p></td>
</tr>

<tr bgcolor="#e8e8e8">
<td width="20%">CWE Id</td><td width="80%">16</td>
</tr>

<tr bgcolor="#e8e8e8">
<td width="20%">WASC Id</td><td width="80%">15</td>
</tr>

<tr bgcolor="#e8e8e8">
<td width="20%">Source ID</td><td width="80%">3</td>
</tr>

</table>
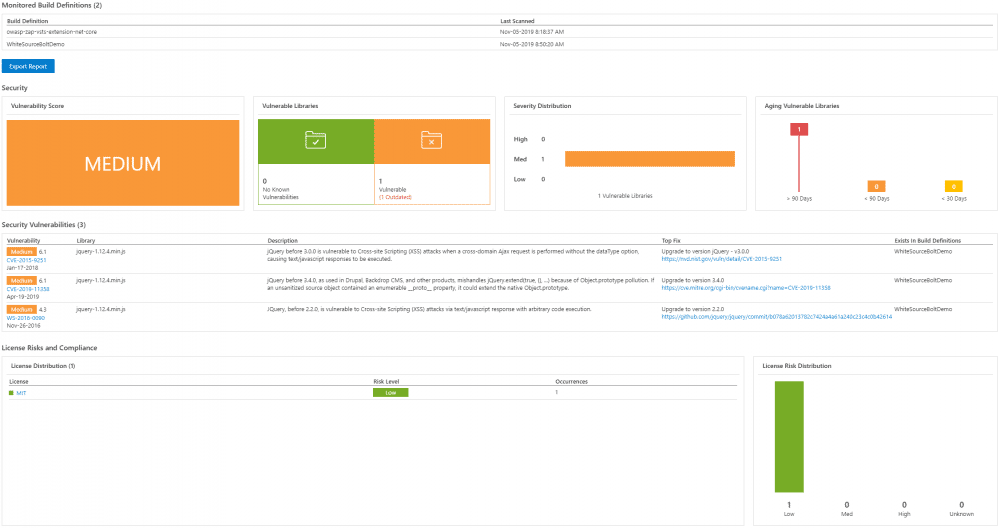
WhiteSource Bolt

WhiteSource Bolt is an extension for Azure DevOps that looks for open source components in your software, without scanning the code.
When added to your build pipeline, it provides real time alerts for outdated and vulnerable open source components. It also provides feedback on the licensing for the open source components that are found. Suggested solutions are provided for issues that are flagged.
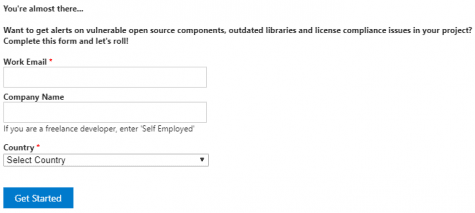
After installing the extension you will need to provide additional registration details for the project.
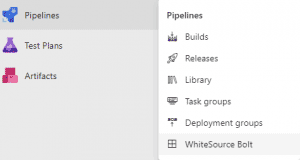
The WhiteSource Bolt reporting console is available from the Pipelines menu within Azure DevOps.
WhiteSource Bolt should be added to your build pipeline to scan the repository for open source files with any build steps preceding eg. npm
Pricing
- WhiteSource Bolt can be used free of charge but is limited to 5 scans per day per repository.
- Pricing is not black and white, but it starts at ~$4000 for an annual license.
- The annual license gives you these additional features:
- Manage your entire pipeline, including your binary repositories, package managers, build tools and CI servers.
- Enforce policies automatically to approve, reject, reassign or even open an issue ticket to get full control and automate current manual time-consuming tracking and approval processes.
- Prioritization tool that can reduce 70% of all security alerts by usage analysis (effective usage analysis).
- Unlimited number of scans available.
Build Pipeline
This basic build pipeline will scan your project with WhiteSource Bolt.
trigger:
- master

pool:
  vmImage: 'ubuntu-latest'

steps:
- task: WhiteSource Bolt@19
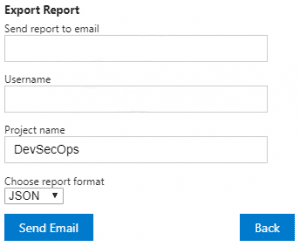
Reporting
The report can be exported to JSON, Excel, PDF and HTML.
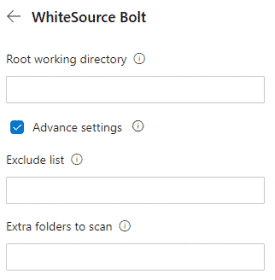
There is the ability to exclude files/folders and add additional folders to scan.
Keep in mind there may be some false positives that are flagged, do your due diligence to determine this.
Sample Report