
Application Security Groups (ASG) provide a mechanism to simplify networking rules of your Virtual Machines (VM) by logically grouping them rather than managing them using their explicit IP addresses and subnets.
ASGs allow you to leverage a more simplified approach to using Network Security Groups (NSG), and they also provide the opportunity to use fewer NSGs in your subscription.
If you are unfamiliar with what a NSG is, it is a set of network security rules (allow/deny) which can be applied at the subnet and/or network interface level.
Why Would You Use It?
Application Security Groups (ASG) drastically improve management of security rules within NSGs. They also make rules easier to read when you need to review the rules within a NSG.
This feature allows you to reuse your security policy at scale without manual maintenance of explicit IP addresses and subnets.
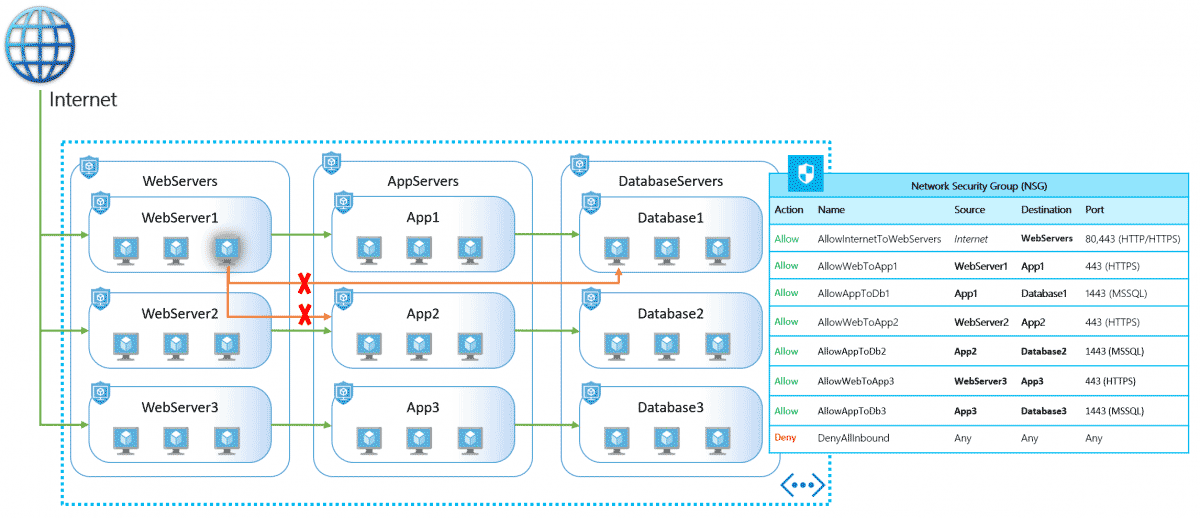
A Really Good Illustration
This picture is courtesy of Microsoft, I had to add it to my blog since it illustrates so nicely how ASGs can be leveraged, and it also shows how the NSG rules could be implemented across multiple ASGs.
It also shows how your source and destination are now more meaningful, rather than subnets that you may need to reference elsewhere to know what they really are.
Implementation
First things first, you need to establish an ASG strategy. This strategy should be based on how you currently deploy applications in your Azure environment. Gather some of that information and find the patterns and similarities, as well as any exceptions.
After you’ve established your ASG strategy and have created your application groups and their respective NSG rules, you will see the true power of this feature. When you deploy new VMs to Azure, you just assign their network interface to previously created ASG(s) and voila.
On-Boarding Process for Existing Environment
- Create all the necessary ASGs based on your ASG strategy.
- Create all of the ASG network interface assignments.
There are two ways you could go with the NSGs:
- Update the existing NSGs as required, adding all of the necessary ASG rules which will replace your existing NSG rules, while removing the existing rules which overlap.
- Assuming you apply your NSG at the subnet level, create a new NSG/NSGs with all the of the new rules you will be implementing, and then swap the NSG on the subnet. This approach you could use to reduce the number of existing NSGs, and potenitially move to one NSG. This would be my preferred approach.
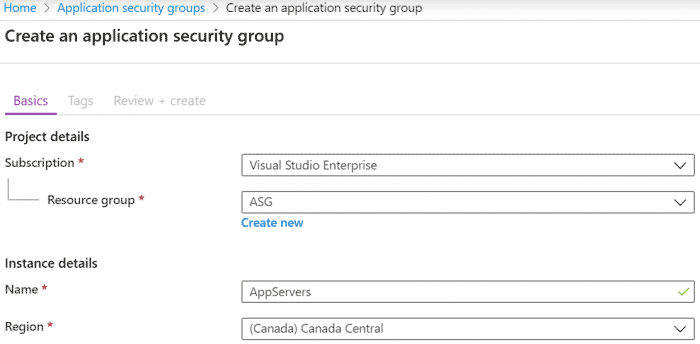
Create an Application Security Group (ASG)
Portal
- Type in “asg” in the global search field, and select “Application security groups”.
- Click Add.
- Select an appropriate Resource group location, descriptive Name and Region. Create the ASG in the same region as the virtual machines.
Automated Approach
This example will create a Resource group called ASG and create two ASGs (AppServers, DbServers) in the Resource group.
Terraform
Terraform supports the creation of ASGs using azurerm_application_security_group.
resource "azurerm_resource_group" "application_security_group-rg" {
  name     = "ASG"
  location = "canadacentral"
}

resource "azurerm_application_security_group" "application_security_group-asg-appservers" {
  name                = "AppServers"
  location            = azurerm_resource_group.application_security_group-rg.location
  resource_group_name = azurerm_resource_group.application_security_group-rg.name
}

resource "azurerm_application_security_group" "application_security_group-asg-dbservers" {
  name                = "DbServers"
  location            = azurerm_resource_group.application_security_group-rg.location
  resource_group_name = azurerm_resource_group.application_security_group-rg.name
}
Azure Resource Manager (ARM) Template
{
    "$schema": "https://schema.management.azure.com/schemas/2015-01-01/deploymentTemplate.json#",
    "contentVersion": "1.0.0.0",
    "parameters": {
        "applicationSecurityGroupName": {
            "type": "string"
        }
    },
    "resources": [
        {
            "type": "Microsoft.Network/applicationSecurityGroups",
            "apiVersion": "2019-11-01",
            "name": "[parameters('applicationSecurityGroupName')]",
            "location": "canadacentral"
        }
    ]
}
Usage
New-AzResourceGroupDeployment -ResourceGroupName ASG -TemplateFile .\Create-ASG.json -applicationSecurityGroupName "AppServers"
New-AzResourceGroupDeployment -ResourceGroupName ASG -TemplateFile .\Create-ASG.json -applicationSecurityGroupName "DbServers"
PowerShell
New-AzResourceGroup -Name ASG -Location canadacentral
New-AzApplicationSecurityGroup -ResourceGroupName ASG -Name AppServers -Location canadacentral
New-AzApplicationSecurityGroup -ResourceGroupName ASG -Name DbServers -Location canadacentral
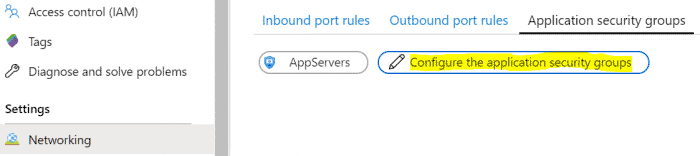
Assign Virtual Machine Network Interface to ASG
Portal
- Type in “vm” in the global search field, and select “Virtual machines”.
- Choose a Virtual Machine you’d like to assign to an ASG.
- Select Networking and click on Application security groups
- Click Configure the application security groups
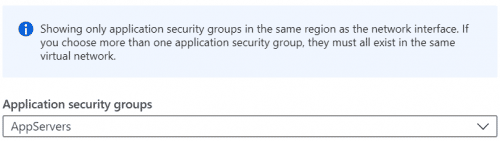
- Select the ASG using the right pane that appears and click Save.
Automated Approach
Expanding on the previous example, we now assign an ASG to a previously existing network interface.
Terraform
Terraform supports managing the association between a network interface and an ASGs using azurerm_network_interface_application_security_group_association.
resource "azurerm_resource_group" "application_security_group-rg" {
  name     = "ASG"
  location = "canadacentral"
}

resource "azurerm_application_security_group" "application_security_group-asg-appservers" {
  name                = "AppServers"
  location            = azurerm_resource_group.application_security_group-rg.location
  resource_group_name = azurerm_resource_group.application_security_group-rg.name
}

resource "azurerm_application_security_group" "application_security_group-asg-dbservers" {
  name                = "DbServers"
  location            = azurerm_resource_group.application_security_group-rg.location
  resource_group_name = azurerm_resource_group.application_security_group-rg.name
}

data "azurerm_network_interface" "network_interface-asg-assign" {
  name                = "vm-nic01"
  resource_group_name = "resourceGroup01"
}

resource "azurerm_network_interface_application_security_group_association" "application_security_group_association" {
  network_interface_id          = data.azurerm_network_interface.network_interface-asg-assign.id
  ip_configuration_name         = "ipconfig1"
  application_security_group_id = azurerm_application_security_group.application_security_group-asg-appservers.id
}
PowerShell
$appAsg = Get-AzApplicationSecurityGroup -ResourceGroupName ASG -Name AppServers
$vmNic = Get-AzNetworkInterface -Name vm-nic01 -ResourceGroupName resourceGroup01
$vmNic.IpConfigurations[0].ApplicationSecurityGroups = $appAsg
$vmNic | Set-AzNetworkInterface
Create a Network Security Group (NSG) and Security Rules
- Type in “nsg” in the global search field, and select “Network security groups”.
- Click Add.
- Select an appropriate Resource group location, descriptive Name and Region. Create the NSG in the same region as the virtual machines.
- Once the NSG is created, go ahead and create the necessary inbound and outbound security rules using the application security group(s) as the source/destination.
References
- Script snippets available on my Github
- Microsoft overview available here.
- Microsoft documentation available here.