
With the big push to the cloud, it’s easy to get ahead of ourselves and overlook important things that can make our jobs and lives easier.
Often times, we start deploying infrastructure and applications into the cloud and very quickly there is a large number of assets that need to be managed. These resources may have been deployed in a variety of ways.
Perhaps a user has recently deployed a resource type that is not part of your organizational standard. How do you deny this type of activity?
A number of your Virtual Machines (VMs) are not being backed up, but standard policy states all VMs should be backed up. How do to you audit this type of activity?
This is where Azure Policy can help. We can start to define and apply policies that mean something to the organization, by doing so we can track policy compliance and resource hygiene.
What Is It?
Azure Policy keeps track of compliance for your Azure resources based on policy definitions you assign, these are called policy assignments.
By default, Microsoft provides many built-in definitions that you can leverage as you see fit. If there is something specific you are looking to achieve Azure Policy allows you to create custom definitions.
On top of this, Azure Security Center (ASC) by default assigns it’s policy initiative to each and every subscription. A policy initiative is a collection of policy definitions. ASC’s policy initiative consists of roughly 100 policy definitions as of this writing.
Why Would You Use It?
Azure Policy provides a mechanism to track compliance of your Azure resources in your environment.
Any non-compliant resources are identified with compliance details.
Azure Policy allows you to quickly get an idea of the health of your resources from a compliance standpoint. It can help you identify anomalies or new trends, which aids in remediating potential problem sources.
What About Azure Blueprints?
It’s particularly hard to talk about Azure Policy and not mention Azure Blueprints.
Before you create your first subscription in Azure, you should consider using Azure Blueprints.
Azure Blueprints provide a mechanism to assist with initial environment setup by providing a consistent and repeatable method for applying a standard set of policies and role assignments to your subscriptions. It also helps centralize things like your log analytics workspace and SQL auditing locations.
Azure Blueprints are meant to help with initial subscription setup by applying a “standard pattern” across any or all of your subscriptions with inheritance from the management group level.
For the sake of this article we are focusing on Azure Policy.
Best Practices
Microsoft recommends using policy initiatives.
With a policy initiative you can group many definitions together to simplify management. To make compliance more meaningful, you can group common definitions together. For example, you could create a policy initiative that only has Azure VM specific policies. Doing this will give you a very quick view of how compliant your Azure VMs are.
Using policy initiatives also improves the Azure portal experience for whomever will be reporting and tracking compliance.
Had you assigned policy definitions directly one by one, you would’ve found it results in a very unorganized mess.
Assign common policies at the management group level where possible, so they are easier to manage.
How to Create a Custom Policy
There will be cases where you have a business requirement that can’t be fulfilled using the built-in policy definitions, this is where creating a custom policy is the way to go.
There are several tools I like to leverage when creating custom policies, these include:
- Azure Resource Manager
- Azure Policy Aliases
- Azure Resource Manager Template
- Azure Policy VSCode Extension
- Azure Policy Definition Structure
- Built-in Policies
- Azure Policy Examples
- Azure Policy GitHub
Understanding your requirements are of the utmost importance, do not begin work on your policy until you have them understood.
Example
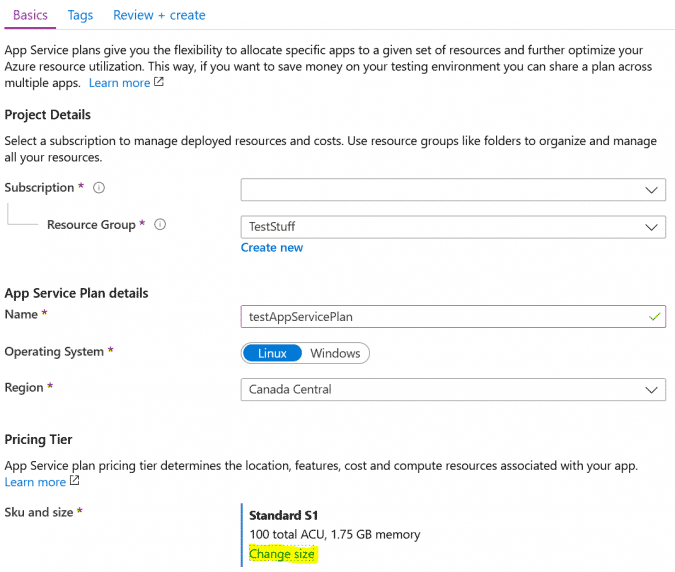
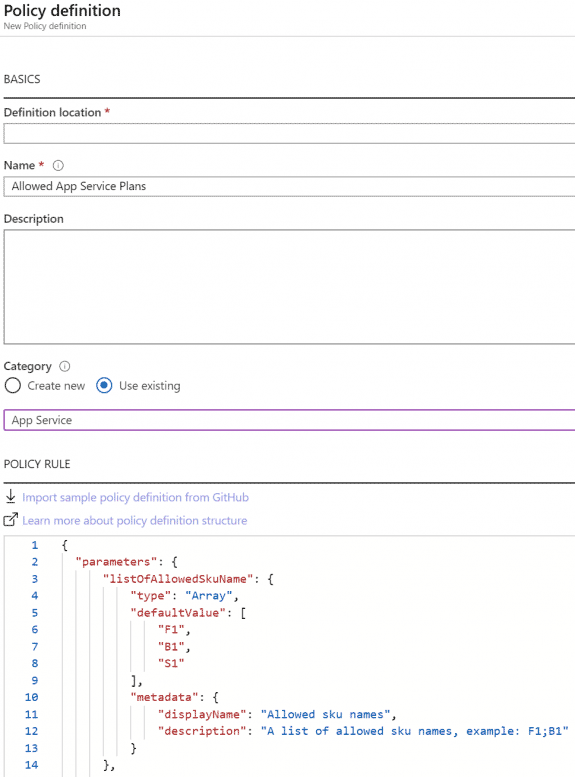
Let’s say that our business only wants users to deploy F1, B1 and S1 App Service Plans in their Azure subscription.
In this example we will create a custom policy that will enforce just that.
First thing I like to do is to understand the resource by walking through the deployment wizard in the portal, and exporting the Azure Resource Manager (ARM) template without actually deploying the resource.
If you have previously deployed an App Service plan you can go to the resource and do the same thing. The template will look differently but it will show the same resource structure.
An easier method if you already have a resource deployed is to use Azure Resource Explorer or Azure Policy VSCode Extension, just browse the the resource to see the properties.

ARM Template
{
    "$schema": "http://schema.management.azure.com/schemas/2015-01-01/deploymentTemplate.json#",
    "contentVersion": "1.0.0.0",
    "parameters": {
        "name": {
            "type": "string"
        },
        "location": {
            "type": "string"
        },
        "sku": {
            "type": "string"
        },
        "skucode": {
            "type": "string"
        },
        "workerSize": {
            "type": "string"
        },
        "workerSizeId": {
            "type": "string"
        },
        "numberOfWorkers": {
            "type": "string"
        },
        "hostingEnvironment": {
            "type": "string"
        }
    },
    "resources": [
        {
            "apiVersion": "2018-11-01",
            "name": "[parameters('name')]",
            "type": "Microsoft.Web/serverfarms",
            "location": "[parameters('location')]",
            "kind": "linux",
            "tags": {},
            "properties": {
                "name": "[parameters('name')]",
                "workerSize": "[parameters('workerSize')]",
                "workerSizeId": "[parameters('workerSizeId')]",
                "numberOfWorkers": "[parameters('numberOfWorkers')]",
                "reserved": true,
                "hostingEnvironment": "[parameters('hostingEnvironment')]"
            },
            "sku": {
                "Tier": "[parameters('sku')]",
                "Name": "[parameters('skuCode')]"
            }
        }
    ]
}
Parameters
{
    "$schema": "https://schema.management.azure.com/schemas/2015-01-01/deploymentParameters.json#",
    "contentVersion": "1.0.0.0",
    "parameters": {
        "name": {
            "value": "testAppServicePlan"
        },
        "hostingEnvironment": {
            "value": ""
        },
        "location": {
            "value": "Canada Central"
        },
        "sku": {
            "value": "Standard"
        },
        "skuCode": {
            "value": "S1"
        },
        "workerSize": {
            "value": "0"
        },
        "workerSizeId": {
            "value": "0"
        },
        "numberOfWorkers": {
            "value": "1"
        }
    }
}
Create Policy
For this example, we are interested in the sku section, we will be targeting the parameter skuCode from above to use in our custom policy.
Let’s check and see what aliases are available.
Get-AzPolicyAlias | Where-Object Namespace -eq "Microsoft.Web" | Where-Object ResourceType -eq "serverFarms" | Select-Object -ExpandProperty Aliases
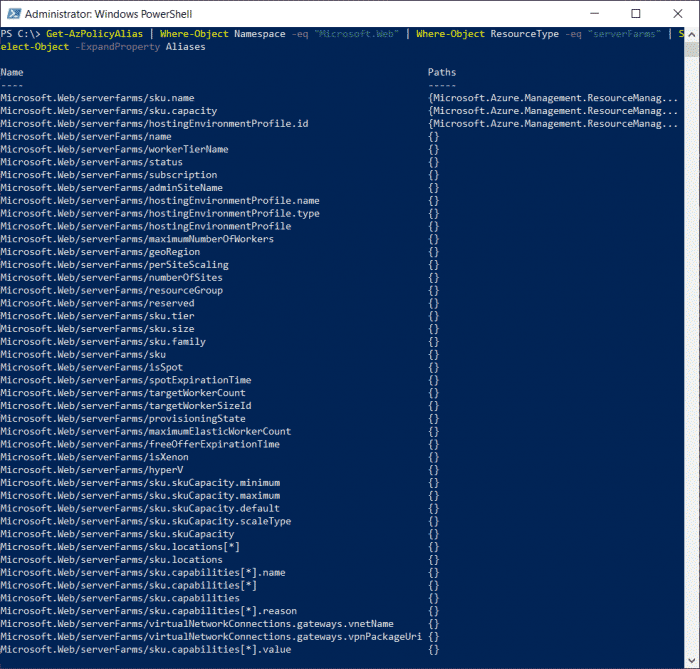
We can see that Microsoft.Web/serverfarms/sku.name is an alias we can work with, so let’s make a custom policy.
Azure Portal
My preference is to write the policy and validate using the Azure Portal. The Portal will assist you as well with validation.
You can source this template from my GitHub.
{
  "parameters": {
      "listOfAllowedSkuName": {
          "type": "Array",
          "defaultValue": [
              "F1",
              "B1",
              "S1"
          ],
          "metadata": {
              "displayName": "Allowed sku names",
              "description": "A list of allowed sku names, example: F1;B1"
          }
      },
      "effect": {
          "type": "String",
          "defaultValue": "Deny",
          "allowedValues": [
              "Audit",
              "Deny",
              "Disabled"
          ],
          "metadata": {
              "displayName": "Effect",
              "description": "Enable or disable the execution of the policy"
          }
      }
  },
  "policyRule": {
      "if": {
          "allOf": [{
                  "field": "type",
                  "equals": "Microsoft.Web/serverfarms"
              },
              {
                  "field": "Microsoft.Web/serverfarms/sku.name",
                  "notIn": "[parameters('listOfAllowedSkuName')]"
              }
          ]
      },
      "then": {
          "effect": "[parameters('effect')]"
      }
  }
}
Testing
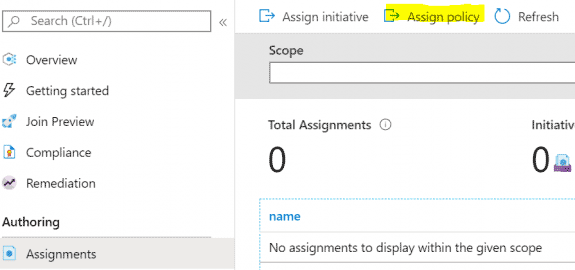
Now that we have created the policy definition, we can create and assign the policy in Azure.
You can use the Azure Portal to do this, it is very straight forward.
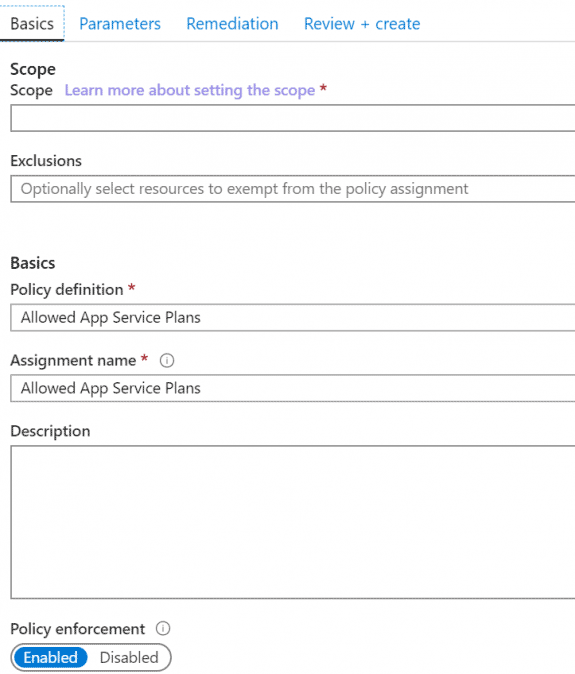
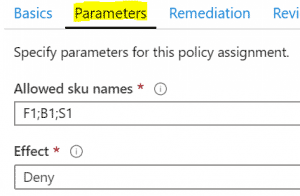
Set your policy parameters as desired and save your assignment, now deploy some App Service Plans using different values that should either pass or fail to confirm your policy is working.
Attempting to deploy a sku that is not in the policy will fail, you will see a message similar to this during deployment.

Once you’ve validated your policy, delete the assignment and definition.
In the next section we will automate the deployment.
ARM Template Deployment
For the purpose of this post, we will walk through how to deploy in an automated fashion using an ARM template deployment.
Note we use the escape character [ when referencing parameters in the policy definition. This is so the template does not try to resolve them, it will fail without the escape character.
The following template will create the custom policy definition, create a policy initiative and add the custom policy, along with a built-in policy. It will then assign the policy initiative at the subscription level.
You can source this template from my GitHub.
{
    "$schema": "https://schema.management.azure.com/schemas/2018-05-01/subscriptionDeploymentTemplate.json#",
    "contentVersion": "1.0.0.0",
    "parameters": {},
    "variables": {},
    "resources": [
    {
        "type": "Microsoft.Authorization/policyDefinitions",
        "name": "policyDefinition-allowed-app-service-plans",
        "apiVersion": "2019-09-01",
        "properties": {
            "displayName": "Allowed App Service Plans",
            "policyType": "Custom",
            "mode": "All",
            "description": "Will allow app service plans that have a specific sku name",
            "metadata": {
                "category": "App Service"
            },
            "parameters": {
                "listOfAllowedSkuName": {
                    "type": "Array",
                    "defaultValue": [
                        "F1",
                        "B1",
                        "S1"
                    ],
                    "metadata": {
                        "displayName": "Allowed sku names",
                        "description": "A list of allowed sku names, example: F1;B1"
                    }
                },
                "effect": {
                    "type": "String",
                    "defaultValue": "Deny",
                    "allowedValues": [
                        "Audit",
                        "Deny",
                        "Disabled"
                    ],
                    "metadata": {
                        "displayName": "Effect",
                        "description": "Enable or disable the execution of the policy"
                    }
                }
            },
            "policyRule": {
                "if": {
                    "allOf": [{
                            "field": "type",
                            "equals": "Microsoft.Web/serverfarms"
                        },
                        {
                            "field": "Microsoft.Web/serverfarms/sku.name",
                            "notIn": "[[parameters('listOfAllowedSkuName')]"
                        }
                    ]
                },
                "then": {
                    "effect": "[[parameters('effect')]"
                }
            }
        }
    },
        {
        "type": "Microsoft.Authorization/policySetDefinitions",
        "name": "policySetDefinition-custom-policies",
        "apiVersion": "2019-09-01",
        "dependsOn": [
            "policyDefinition-allowed-app-service-plans"
        ],
        "properties": {
            "displayName": "App service policy definition collection",
            "policyType": "Custom",
            "description": "Specific Azure policy definitions that are deemed valuable for Cloud governance of Azure App Service.",
            "metadata": {
                "category": "App Service"
            },
            "policyDefinitions": [{
                    "policyDefinitionId": "[resourceId('Microsoft.Authorization/policyDefinitions', 'policyDefinition-allowed-app-service-plans')]",
                    "parameters": {
                        "listOfAllowedSkuName": {
                            "value": [
                                "F1",
                                "B1"
                            ]
                        },
                        "effect": {
                            "value": "Deny"
                        }
                    }
                },
                {
                    "policyDefinitionId": "/providers/Microsoft.Authorization/policyDefinitions/0b60c0b2-2dc2-4e1c-b5c9-abbed971de53",
                    "parameters": {
                        "effect": {
                            "value": "Audit"
                        }
                    }
                }
            ]
        }
    },
    {
        "type": "Microsoft.Authorization/policyAssignments",
        "name": "policyAssignment-custom-policies",
        "apiVersion": "2019-09-01",
        "dependsOn": [
            "policySetDefinition-custom-policies"
        ],
        "properties": {
            "displayName": "App service policy definition collection",
            "scope": "[subscription().id]",
            "policyDefinitionId": "[resourceId('Microsoft.Authorization/policySetDefinitions', 'policySetDefinition-custom-policies')]"
        }
    }
]}
Run the following to deploy using PowerShell.
New-AzDeployment -Location "canadacentral" -TemplateFile azuredeploy.json
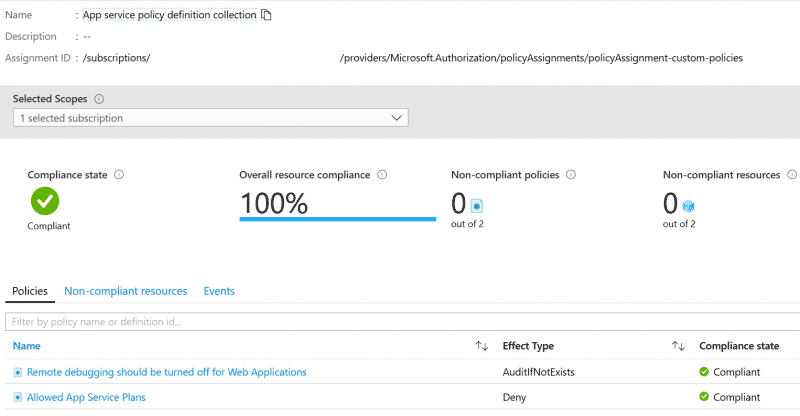
Compliance
It takes roughly 20-30 minutes for Azure to update compliance findings for your newly assigned policy, after such time you will see something like this.
Automate With DevOps Pipeline
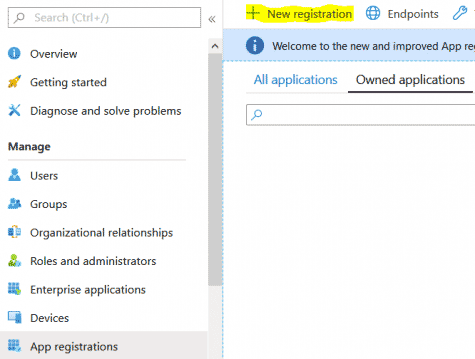
- Go to Azure Active Directory and create a new Application Registration
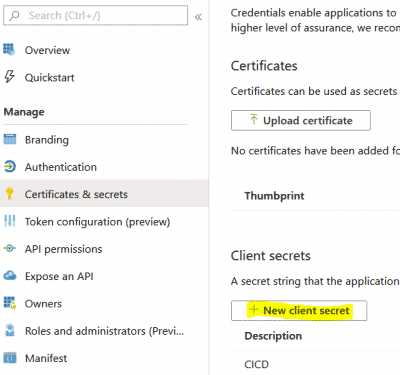
- Generate a new secret for the Application Registration, copy the secret to the clipboard
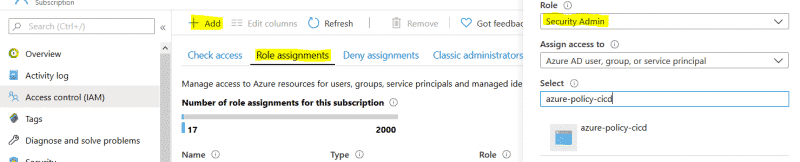
- Give the Application Registration “Security Admin” IAM role at Subscription level
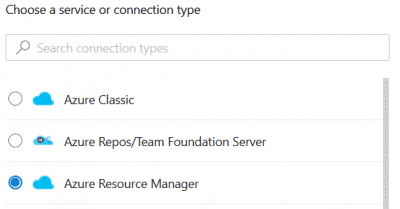
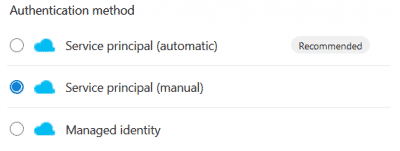
- From Azure DevOps, go to Project Settings and create a new Service Connection using the Application Registration details and the new secret. Verify and save.

-
Create a new Release Pipeline and source your artifacts
-
Add an Azure PowerShell task using the newly created Service Connection and add the follwing Inline script (replacing {artifact name}):

cd $(System.DefaultWorkingDirectory)/_{artifact_name}
New-AzDeployment -Location "canadacentral" -TemplateFile "azuredeploy.json"
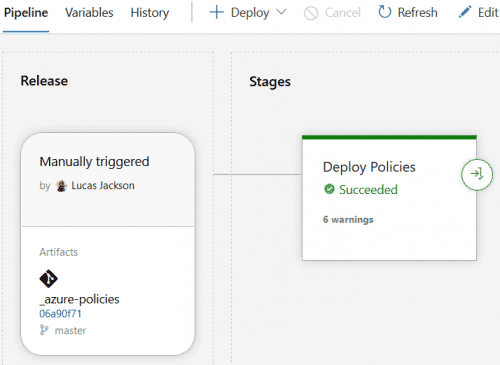
- Save the Pipeline and trigger a release. You will see some warnings, they are safe to ignore.
Turn on Continuous Deployment if desired.
Since it’s a Subscription level deployment, we have to leverage Azure PowerShell.
Typically I would use the native DevOps Azure Resource Group Deployment task for ARM deployments, but it does not support this type of deployment at the time of this writing.
References
- Azure Policy Documentation
- Azure Policy Definition Structure
- Azure Policy Definition Schema
- Azure Blueprints
- Azure Resource Manager
- Azure Policy Examples
- My GitHub