
This post will cover the full process end to end to get your Hugo static website hosted on S3 and CloudFront. This post will cover the certificate generation process and the automated deployment of your website using CI/CD from GitLab.
Create S3 Bucket
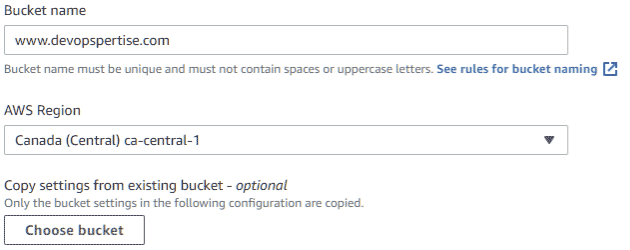
- Log into AWS Console and go to S3.
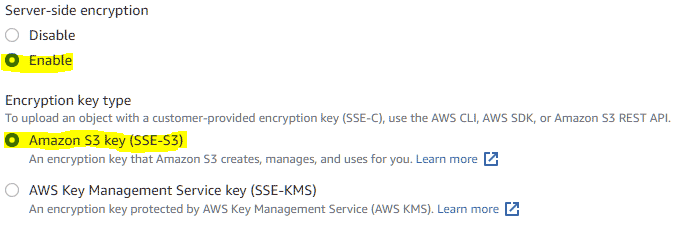
- Create a new bucket, select an appropriate location and give your bucket a relevant name. Enable encryption (not required but I always like to enable encryption where possible) and block all public access to the bucket.

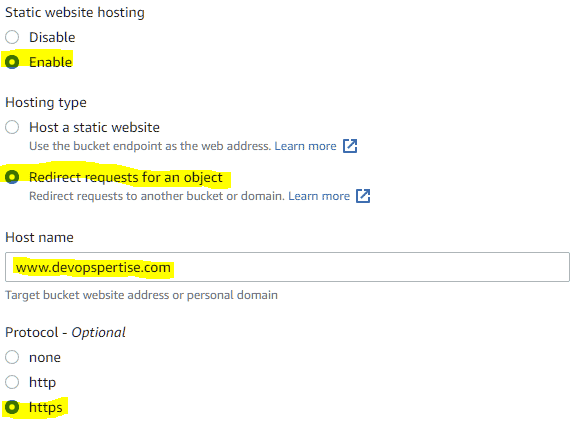
- Go to your newly created bucket and click Properties. Scroll down to the bottom section Static website hosting and click Edit. We are setting it like this since we want CloudFront to handle all our traffic, if someone hits the S3 bucket directly they will be forced back to our website.
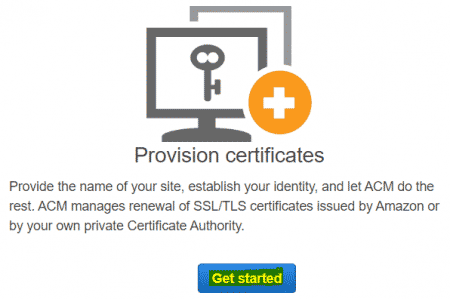
Create a Certificate
Amazon has it’s own Certificate Authority (CA), AWS Certificate Manager (ACM) provides the ability to create certificates and automate their renewal. When you create your certificate makes sure you use US East (N. Virginia) Region, this is a requirement when using CloudFront.
- Go to AWS Console and go to Certificate Manager.
- Click Get Started on Provision Certificates and create a Public Certificate.
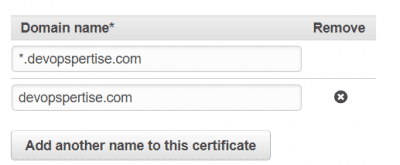
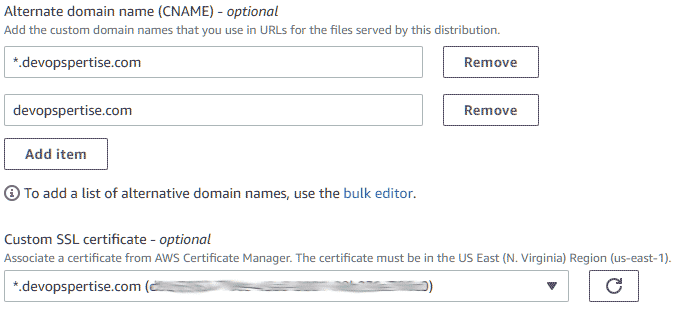
- Add your domain names, in my case I am adding *.devopspertise.com and devopspertise.com
-
Select a validation method, my preference is DNS validation since I own the domain.
-
Review your request and then click Confirm and request.
-
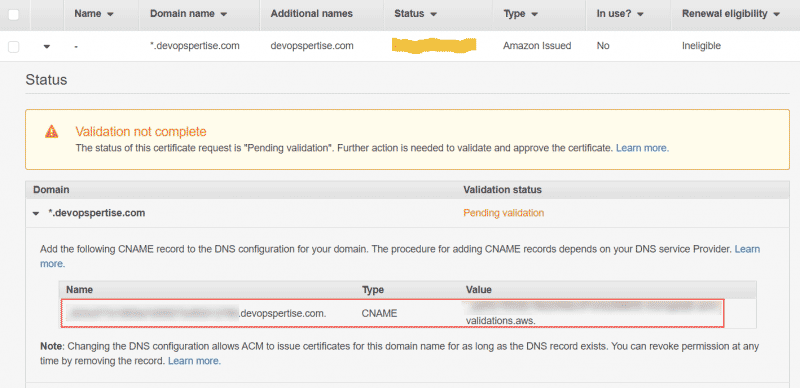
You will be asked to add a CNAME record in DNS. Once you’ve added the record, the certificate will be issued by Amazon. Validation occurs very quickly after you’ve added the CNAME record. Going forward you need to leave this CNAME record in DNS so Amazon can issue certificates.

After you’ve integrated this certificate with CloudFront, the renewal eligibility will change to eligible.
Create CloudFront Distribution
- Go to AWS Console and go to CloudFront.
- Create a new Distribution.

- Select your S3 bucket from earlier as the Origin domain.
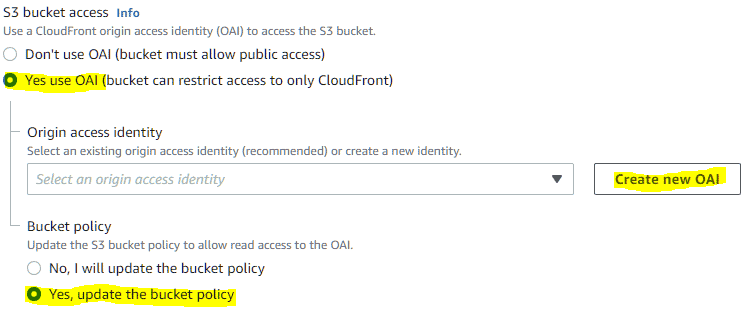
- Set S3 bucket access to Yes use OAI (bucket can restrict access to only CloudFront).
- Click Create new OAI to create a new access identity.
- Set Bucket policy to Yes, update the bucket policy.
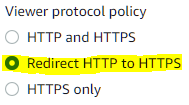
- Set Viewer Protocol Policy to Redirect HTTP to HTTPS.
- Add Alternate domain name (CNAME) as required.
- Select your Custom SSL certificate that we created in the previous step.
- Set Default Root Object to your landing page document (eg. index.html).
-
Create your distribution, it will take some time to deploy it.
-
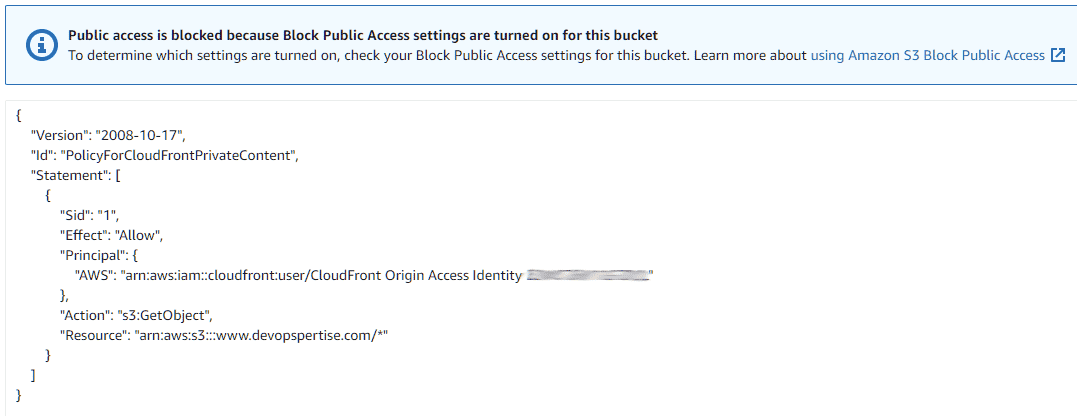
If you’re curious you can check out your S3 bucket policy now, it’s been updated to provide access to CloudFront.
Setup CI/CD for GitLab Integration
Create User
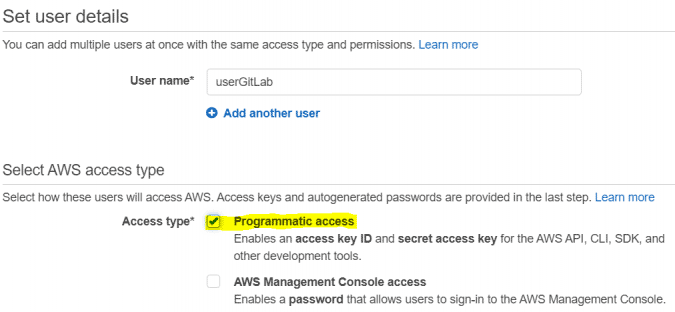
Before we can configure the GitLab pipeline, we need to create a new user and assign a permissions policy so it can access and modify our S3 bucket.
-
Go to AWS Console and go to IAM > Users.
-
Click Add User.

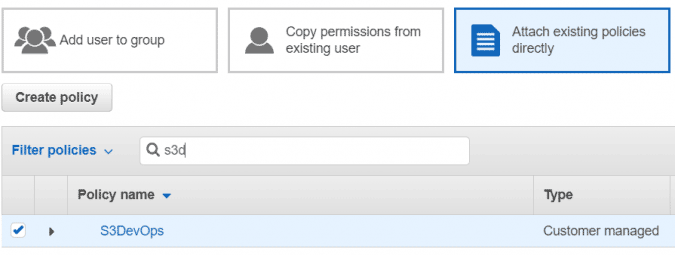
- Click Create Policy, a new browser tab will open.

- Create the policy using the JSON document below, making the necessary alterations to bucketName id and distId for your scenario. Give the policy whatever name you desire.
{
    "Version": "2012-10-17",
    "Statement": [
        {
            "Sid": "getPutDelS3",
            "Effect": "Allow",
            "Action": [
                "s3:GetObject",
                "s3:PutObject",
                "s3:DeleteObject"
            ],
            "Resource": "arn:aws:s3:::<bucketName>/*"
        },
        {
            "Sid": "listS3",
            "Effect": "Allow",
            "Action": "s3:ListBucket",
            "Resource": "arn:aws:s3:::<bucketName>"
        },
        {
            "Sid": "invalidateCloudFront",
            "Effect": "Allow",
            "Action": [
                "cloudfront:CreateInvalidation",
                "cloudfront:GetInvalidation",
                "cloudfront:ListInvalidations"
            ],
            "Resource": "arn:aws:cloudfront::<id>:distribution/<distId>"
        }
    ]
}
- Go back to the Add User tab, refresh the policies and attach your newly created policy. Create the account.
- Take note of the Access key ID and the Secret access key, these will be used when we setup the GitLab pipeline.
Create Pipeline
-
Create a new GitLab project or use an existing one.
-
Go to the project, from the left menu bar select Settings > CI / CD.
-
Scroll down to variables and add the variables below with the Access key ID and the Secret access key captured previously.
- AWS_ACCESS_KEY_ID
- AWS_SECRET_ACCESS_KEY

-
If you have no files in your project add a test file.
-
Create a new file named .gitlab-ci.yml and update AWS_DEFAULT_REGION, BUCKET_NAME and CLOUDFRONT_DIST_ID.
stages:
  - build
  - deploy

variables:
  AWS_DEFAULT_REGION: ca-central-1
  BUCKET_NAME: <bucketName>
  CLOUDFRONT_DIST_ID: <distId>
  GIT_SUBMODULE_STRATEGY: recursive

buildHugo:
  image: klakegg/hugo:0.84.4-ubuntu-ci
  stage: build
  script:
    - hugo -v
  artifacts:
    paths:
      - public
  only:
    - master

deploys3:
  image: python:latest
  stage: deploy
  dependencies:
    - buildHugo
  before_script:
    - pip install awscli
  script:
    - aws configure set preview.cloudfront true
    - aws s3 sync ./public s3://$BUCKET_NAME --delete
    - aws cloudfront create-invalidation --distribution-id $CLOUDFRONT_DIST_ID --paths "/*"
  only:
    - master
- Your GitLab pipeline will now execute and copy your repository to your S3 bucket.

Validate Your Deployment
-
Test your CloudFront distribution url to ensure everything is working as anticipated.
-
Add your CNAME record in DNS to point to your CloudFront distribution.
-
Verify your CloudFront has an invalidation, this is created by the GitLab pipeline. Go to your CloudFront distribution and click Invalidations, you should see a job ID there.

Additional Configuration
Error Pages
When someone tries to access a url on your website that does not exist, they will get a nice forbidden message.
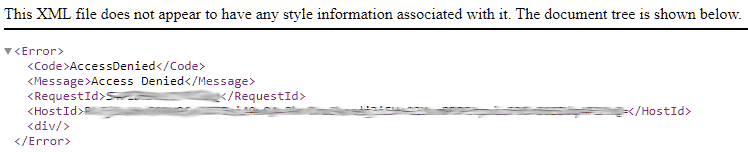
To make this nice we can add error pages to the CloudFront distribution.
-
Go to your CloudFront distribution and click Error pages.
-
Click Create custom error response.
- Set HTTP error code to 403: Forbidden.
- Set Customize error response to Yes.
- Update Response page path to /path-of-your-error-page.html.
- Set HTTP Response code to 404: Not Found.
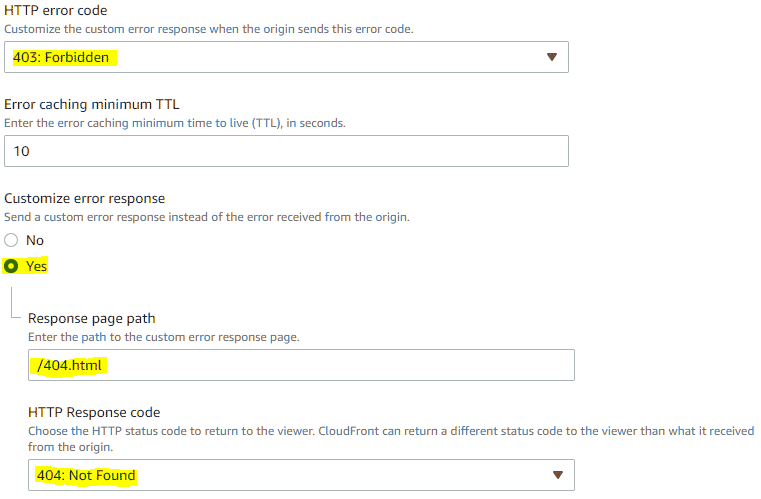
- Repeat this process for any other HTTP error codes you want to handle.
Re-Write Web Request Using Lambda@Edge
If you want to perform re-writes for some specific use case for your static website you can follow this article. It works quite well, tailor it to your requirements.